Introduction
In Part 2, you setup your infrastructure using Terraform, and in this blog, you’ll continue using Terraform to deploy Traefik 2 as the reverse proxy for your OpenShift cluster. You’ll start with an overview of OpenShift’s Security Context Constraints (SCCs), and from the overview, you’ll proceed to create a custom SCC based on the restricted SCC. The custom SCC will be used in the deployment along with extracts of other files from the repo; you’ll inspect each of these stripped-down files to gain an understanding of the functionality they provide. Finally, once Traefik is deployed, you’ll invoke the dashboard using Basic Authentication and a sample application. Because of all that needs to be covered, this will be a long blog with a lot to absorb.
OpenShift’s Security Context Constraints
OpenShift provides Security Context Constraints (SCCs) to allow administrators to control the actions that a pod can perform and what resources it can access. SCCs are cluster-level resources requiring administrators to have cluster-admin privileges to manage them. By default, OpenShift runs all pods with the restricted SCC, which is the most restrictive SCC. But when a pod requires a different set of security features, an administrator may choose the proper SCC from OpenShift’s eight (8) predefined Security Context Constraints, each specifying a set of security features. If none of the predefined SCCs provides exactly the security features that a pod requires, an administrator can create a custom SCC. Below is a list of the most common basic SCC commands:
To list the current SCCs.
$ oc get scc

To verify that a given SCC was created.
$ oc get scc <scc_name>

To create an SCC by passing in a file.
$ oc apply -f <scc-file>.yaml

To examine a specific SCC; e.g., the restricted SCC.
$ oc describe scc restricted

To save the definition of an SCC in a yaml file; e.g., the restricted SCC.
$ oc get scc restricted -o yaml > <file-name>.yaml

To delete an SCC.
$ oc delete scc <scc_name>

To link a custom SCC to a custom service account.
$ oc adm policy add-scc-to-user <scc-name> <service-account-name>
Important: Do not modify the predefined SCCs. Customizing the predefined SCCs can lead to issues when OpenShift is upgraded. Instead, create new custom SCCs.
Warning: Once privileges are given to an SCC and the SCC is granted to a project service account (for example, via a role binding), any deployer in the project can take advantage of those privileges.
Note: Kubernetes uses Pod Security Policy (PSP), but it is optional, although its use is recommended. Nevertheless, PSP was deprecated with Kubernetes version 1.21 (April 2021) and will be removed in version 1.25 (around April 2022). As per the Kubernetes Deprecation Policy, deprecated behaviors must function for no less than one (1) year after their announced deprecation.
Since Traefik requires a different set of security features than those provided by the restricted SSC, you’ll need to create a custom SCC based on the restricted SCC. But before you start, you should ensure the Command Line Interface (CLI) for oc is installed and setup on your machine; once setup, you’ll login to the cluster. Once you are logged in, you’ll capture the definition of the restricted SCC by executing the command below:
PS C:\jct\repos\memories-meta-repo> oc get scc restricted -o yaml > restricted-scc.yamlOnce you have the definition of the restricted SCC in the restricted-scc.yaml file, you can compare it against the mem-traefik-scc.yaml file in the repo, which has the required security features. (To compare files in Windows, I usually use WinMerge.) To highlight the changes, the file mem-traefik-scc.yaml is shown below with the changes in bold; you’ll use this file as the custom SCC for Traefik.
kind: SecurityContextConstraints
apiVersion: security.openshift.io/v1
metadata:
  name: mem-traefik-scc
  annotations:
    kubernetes.io/description: mem-traefik-scc provides all features of the restricted SCC but allows users to run with any UID and any GID.
priority: 10
allowPrivilegedContainer: false
allowPrivilegeEscalation: false
allowHostDirVolumePlugin: false
allowHostNetwork: false
allowHostPorts: false
allowHostPID: false
allowHostIPC: false
readOnlyRootFilesystem: true
allowedCapabilities: [
]
defaultAddCapabilities: [
]
requiredDropCapabilities: [
  ALL
]
runAsUser:
  type: RunAsAny
fsGroup:
  type: RunAsAny
supplementalGroups:
  type: RunAsAny
seLinuxContext:
  type: MustRunAs
users: [
  system:serviceaccount:memories:mem-traefik-service-account
]
groups: [
  system:authenticated
]
volumes: [
  configMap,
  downwardAPI,
  emptyDir,
  persistentVolumeClaim,
  projected,
  secret
]
SCC Properties (restricted)
Let’s briefly describe the properties that are used to validate the pod definition against the configured SCC.
allowPrivilegedContainer
If set to true, it permits containers in a pod to run in privileged mode allowing processes running in the containers full access to the node’s kernel. By default, a container is not allowed to access any devices on the node, but a privileged container is given access to all devices on the node. This allows the container nearly all the same access as processes running on the node. In the container spec, set the property pod.spec.containers[].securityContext.privileged: true. To display the available devices (the directory /dev contains device files for all devices on the system) in a non-privileged/privileged pod, run:$ kubectl exec <pod-name> -n <namespace> -- ls /dev
allowPrivilegeEscalation
It determines whether a process can gain more privileges than its parent process, and it directly controls whether the no_new_privs flag gets set on the container process. This flag is always true when the container is running as privileged or has CAP_SYS_ADMIN. In the container spec, set the property pod.spec.containers[].securityContext.allowPrivilegeEscalation: true.
allowHostDirVolumePlugin
It determines if the policy allows containers to use the HostDir volume plugin.
allowHostNetwork
If set to true, it permits a pod to use the node’s network namespace allowing the pod to access the loopback device, services listening on localhost, and could be used to snoop on network activity of other pods on the same node. In a pod spec, set the property pod.spec.hostNetwork: true. To display the network interfaces in a pod using the node’s network namespace, run$ kubectl exec <pod-name> -n <namespace> -- ifconfig
allowHostPorts
If set to true, it permits a pod to bind to a port in the node’s network namespace allowing the pod to have its own network namespace. In the container spec, set the property pod.spec.containers[].ports[].hostPort: <prot-number> as one of the container’s port. Since two processes cannot bind to the same node port, only one instance of the pod can be scheduled to each node. Because the Scheduler takes this into account when scheduling pods, if there are four (4) nodes and six (6) pod replicas, four will be scheduled, and two (2) will remain in the Pending state. Finally, this property is not to be confused with the NodePort service; they are different features with two main functionality differences:
When a pod is using a hostPort, a connection to the node’s port is forwarded directly to the pod running on that node.
When a pod is exposed through a NodePort service, a connection to the node’s port is forwarded to a randomly selected pod, possibly on another node.
When a pod is using a hostPort, the node’s port is only bound on nodes that are running the pod.
When a pod is exposed through a NodePort service, the node’s port is bound on all nodes, including nodes not running the pod.
allowHostPID
If set to true, it permits a pod to share the node’s process ID namespace allowing processes running in the containers to see all other processes on the node. By default, a pod only sees the processes running on its containers. In the pod spec, set the property pod.spec.hostPID: true. To list all processes running on the node, run$ kubectl exec <pod-name> -n <namespace> -- ps aux
allowHostIPC
If set to true, it permits a pod to share the node’s IPC namespace allowing processes running in the containers to communicate via Inter-Process Communication with all other processes running on the node. In the pod spec, set the property pod.spec.hostIPC: true.
readOnlyRootFilesystem
If set to true, it prevents processes running in a container from writing to the container’s filesystem. When a container’s filesystem is read-only, it is only possible to write on mounted volumes; i.e., mount a volume in every directory the application needs to persist state. In the Container manifest, set the property pod.spec.containers[].securityContext.readOnlyRootFilesystem: true. Even when the container is running as root, which has write permission to the root (/) directory, the write operation fails:$ kubectl exec <pod-name> -n namespace -- touch /test-file
allowedCapabilities
A list of capabilities that a pod can add in the pod.spec.containers[].securityContext.capabilities.add field of the container spec. An empty list means that none of the capabilities can be requested while the special symbol * allows any capabilities. Traditionally, a Linux process is either privileged (root) or unprivileged. A privileged process is not subject to kernel permission checks, and, hence, it has full control of the system. A capability is a distinct and independent privilege that can be used by a process to bypass certain permission checks; it provides fine-grained access to kernel resources. That is, instead of making a container privileged (allowPrivilegedContainer) and giving it unlimited permissions, a safer solution, from a security perspective, is to give it access only to the kernel features it requires.
defaultAddCapabilities
All capabilities listed in this field will be added to every container running in the pod. If a container does not require a listed capability, the capability needs to be explicitly dropped in the spec of the container (pod.spec.containers[].securityContext.capabilities.drop).
requiredDropCapabilities
All capabilities listed in the container’s field pod.spec.containers[].securityContext.capabilities.drop will be dropped from every container running in the pod.
runAsUser
By default, containers run as root. You can change to a different user ID inside a Dockerfile by using the USER instruction. Once the container image is created with a specific user ID, you may run a pod under a different user ID by setting the container’s property pod.spec.containers[].securityContext.runAsUser.
fsGroup
It defines a pod’s file system group ID, which is added to the container’s supplemental groups. The fsGroup ID is used for block storage. In the pod spec, set the property pod.spec.securityContext: <gid>.
supplementalGroups
Supplemental groups are regular Linux groups. When a process runs in Linux, it has a UID, a GID, and one or more supplemental groups. The supplementalGroups IDs are typically used for controlling access to shared storage.
seLinuxContext
Security-Enhanced Linux (SELinux) is a Linux kernel module that provides additional access control security and offers the following benefits: (1) All processes and files are labeled, (2) Fine-grained access control, (3) SELinux policy is administratively defined and enforced system-wide, (4) Improved mitigation for privilege escalation attacks.
users
The users who can access this SCC.
groups
The groups that can access this SCC.
volumes
A white list of allow volume plugins. Empty indicates that no volumes may be used. To allow all volumes you may use *. The recommended minimum set of allow volumes are emptyDir, secret, configMap, persistentVolumeClaim, projected, and downwardAPI.
Deploying Traefik 2
Traefik is an edge router or reverse proxy that works as an ingress controller (router in OpenShift) for a Kubernetes cluster. It is responsible for ensuring that when traffic from a web application hits the cluster, it will go to the right Service; furthermore, Traefik supports ACME and Let’s Encrypt thereby making it very easy to manage and assign an SSL/TLS certificate to a web application. (You’ll cover ACME and Let’s Encrypt in Part 4.) You’ll install Traefik using the official Traefik helm chart repo and the latest chart version (as of this writing).
Before deploying Traefik, let’s browse through the code that is required for the deployment. These files are extracted from their equivalent files in the repo, but, nonetheless, they’ll deploy Traefik, but without security. The file bootstrap.tf contains all of the modules that will be part of the application.
locals {
  namespace = kubernetes_namespace.ns.metadata[0].name
  ###########
  # Traefik #
  ###########
  ##################
  # Ingress Routes #
  ##################
  ingress_route = "mem-ingress-route"
  ###############
  # Middlewares #
  ###############
  middleware_dashboard_basic_auth = "mem-mw-dashboard-basic-auth"
}

###########
# traefik #
###########
module "traefik" {
  source = "./modules/traefik/traefik"
  app_name = var.app_name
  namespace = local.namespace
  chart_version = "10.24.0"
  service_name = "mem-traefik"
}

module "middleware-dashboard-basic-auth" {
  count = var.k8s_manifest_crd ? 0 : 1
  source = "./modules/traefik/middlewares/middleware-dashboard-basic-auth"
  app_name = var.app_name
  namespace = local.namespace
  traefik_dashboard_username = var.traefik_dashboard_username
  traefik_dashboard_password = var.traefik_dashboard_password
  service_name = local.middleware_dashboard_basic_auth
}

module "whoiam" {
  count = var.k8s_manifest_crd ? 0 : 1
  source = "./modules/traefik/whoami"
  app_name = var.app_name
  app_version = var.app_version
  namespace = local.namespace
  service_name = "mem-whoami"
}

module "ingress-route" {
  count = var.k8s_manifest_crd ? 0 : 1
  source = "./modules/traefik/ingress-route"
  app_name = var.app_name
  namespace = local.namespace
  middleware_dashboard_basic_auth = local.middleware_dashboard_basic_auth
  host_name = "169.46.49.242.nip.io"
  service_name = local.ingress_route
}
By inspecting the file, you’ll notice the locals block defining variables local to this module. Below the locals block, you’ll find three (3) modules; viz., traefik (helm chart to install Traefik), middleware-dashboard-basic-auth (middleware for Basic Authentication), the optional application whoami, and ingress-route (ingress controller). Using this file as our reference, let’s take a closer look at the modules in the order in which they appear. To reiterate, these modules were extracted from their equivalent files in the repo so you can compare them against their equivalents, if so desired.
Free Wildcard DNS Services
But before moving on to the modules, I’ll like to discuss a service that I am using in the ingress-route module above. If you take a look at the module, you’ll see the following line: host_name = "169.46.49.242.nip.io"
You might be asking yourself, what is this? Well, when a cluster is created, an external IP address is assigned to the gateway or reverse proxy, which in our case is Traefik. This is the IP address that you’ll use in your browser to access the application running behind Traefik. But you need a host name to use in the Rule of our ingress controller (discussed later), and not an IP address. There is an easy way to accomplish this with the hosts file:
The hosts file is used to map domain names (hostnames) to IP addresses. It is a plain-text file used by most operating systems including, Linux, Windows, and macOS. The hosts file has priority over DNS. When typing in the domain name of a web site to visit, the domain name must be translated into its corresponding IP address. The operating system first checks its hosts file for the corresponding domain, and if there is no entry for the domain, it will query the configured DNS servers to resolve the specified domain name. This affects only the computer on which the change is made, rather than how the domain is resolved worldwide. Entries in the hosts file have the following format: IPAddress DomainName [DomainAliases]
The IP address and the domain names should be separated by at least one space or tab. The lines starting with # are comments, and they are ignored.
On Linux, the full path to the file is /etc/hosts.
On Windows, the full path to the file is C:\Windows\System32\drivers\etc\hosts.
Unfortunately, this technique requires changing the hosts file, which is best left untouched. To avoid changing the hosts file, I can leveraged one of the free wildcard DNS services for IP addresses such as nip.io, sslip.io, FreeDNS, et al. That is what I have done, and it is what I will continue to do, when appropriate.
module “traefik”
/***
-------------------------------------------------------
A Terraform reusable module for deploying microservices
-------------------------------------------------------
Define input variables to the module.
***/
variable app_name {
  type = string
}
variable namespace {
  type = string
}
variable service_name {
  type = string
}
variable chart_name {
  type = string
  description = "Ingress Controller Helm chart name."
  default = "traefik"
}
variable chart_repo {
  type = string
  description = "Using the official Traefik helm chart (Ingress Controller)."
  default = "https://helm.traefik.io/traefik"
}
variable chart_version {
  type = string
  # To use the latest version, go to https://artifacthub.io/ and type "traefik" on the edit box.
  description = "Ingress Controller Helm repository version."
}

resource "null_resource" "scc-traefik" {
  triggers = {
    always_run = timestamp()
  }
  #
  provisioner "local-exec" {
    command = "oc apply -f ./modules/traefik/traefik/dir/mem-traefik-scc.yaml"
  }
  #
  provisioner "local-exec" {
    when = destroy
    command = "oc delete scc mem-traefik-scc"
  }
}

resource "kubernetes_service_account" "service_account" {
  metadata {
    name = "${var.service_name}-service-account"
    namespace = var.namespace
    labels = {
      app = var.app_name
    }
  }
}

resource "kubernetes_role" "role" {
  metadata {
    name = "${var.service_name}-role"
    namespace = var.namespace
    labels = {
      app = var.app_name
    }
  }
  rule {
    # Resources in the core apiGroup, which has no name - hence the "".
    api_groups = [""]
    verbs = ["get", "watch", "list"]
    # The plural form must be used when specifying resources.
    resources = ["services", "endpoints", "secrets"]
  }
  rule {
    api_groups = ["traefik.containo.us/v1alpha1"]
    verbs = ["get", "watch", "list"]
    resources = [
      "middlewares",
      "ingressroutes",
      "traefikservices",
      "ingressroutetcps",
      "ingressrouteudps",
      "tlsoptions",
      "tlsstores",
      "serverstransports"
    ]
  }
  rule {
    api_groups = ["extensions", "networking.k8s.io"]
    verbs = ["get", "watch", "list"]
    resources = ["ingresses", "ingressclasses"]
  }
  rule {
    api_groups = ["extensions", "networking.k8s.io"]
    verbs = ["update"]
    resources = ["ingresses/status"]
  }
  rule {
    api_groups = ["security.openshift.io"]
    verbs = ["use"]
    resources = ["securitycontextconstraints"]
    resource_names = ["mem-traefik-scc"]
  }
}

# Bind the role to the service account.
resource "kubernetes_role_binding" "role_binding" {
  metadata {
    name = "${var.service_name}-role-binding"
    namespace = var.namespace
    labels = {
      app = var.app_name
    }
  }
  # A RoleBinding always references a single Role, but it can bind the Role to multiple subjects.
  role_ref {
    api_group = "rbac.authorization.k8s.io"
    kind = "Role"
    # This RoleBinding references the Role specified below...
    name = kubernetes_role.role.metadata[0].name
  }
  # ... and binds it to the specified ServiceAccount in the specified namespace.
  subject {
    # The default permissions for a ServiceAccount don't allow it to list or modify any resources.
    kind = "ServiceAccount"
    name = kubernetes_service_account.service_account.metadata[0].name
    namespace = kubernetes_service_account.service_account.metadata[0].namespace
  }
}

resource "helm_release" "traefik" {
  chart = var.chart_name
  repository = var.chart_repo
  version = var.chart_version
  namespace = var.namespace
  name = var.service_name
  values = [file("./modules/traefik/traefik/util/values.yaml")]
  # timeout = 180  # Seconds.
}
chart_version
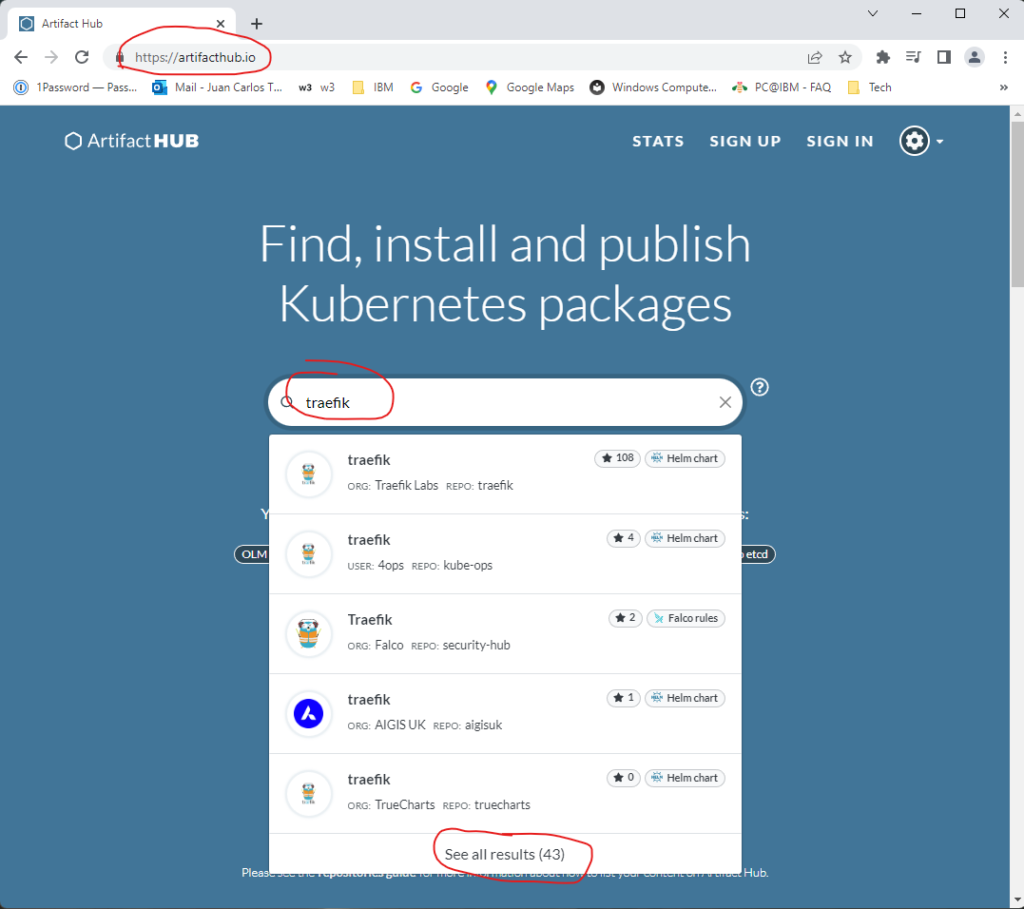
Of the input variables to the module, all are self-explanatory. But to obtain the latest chart_version, you can follow these instructions: Go to the Artifact Hub page, and you’ll be presented with a page like Figure 1A. Type traefik in the search box and then select Select all results (43).
On the next page, you’ll search for the official version from ORG: Traefik Labs and find the VERSION: entry as shown below.
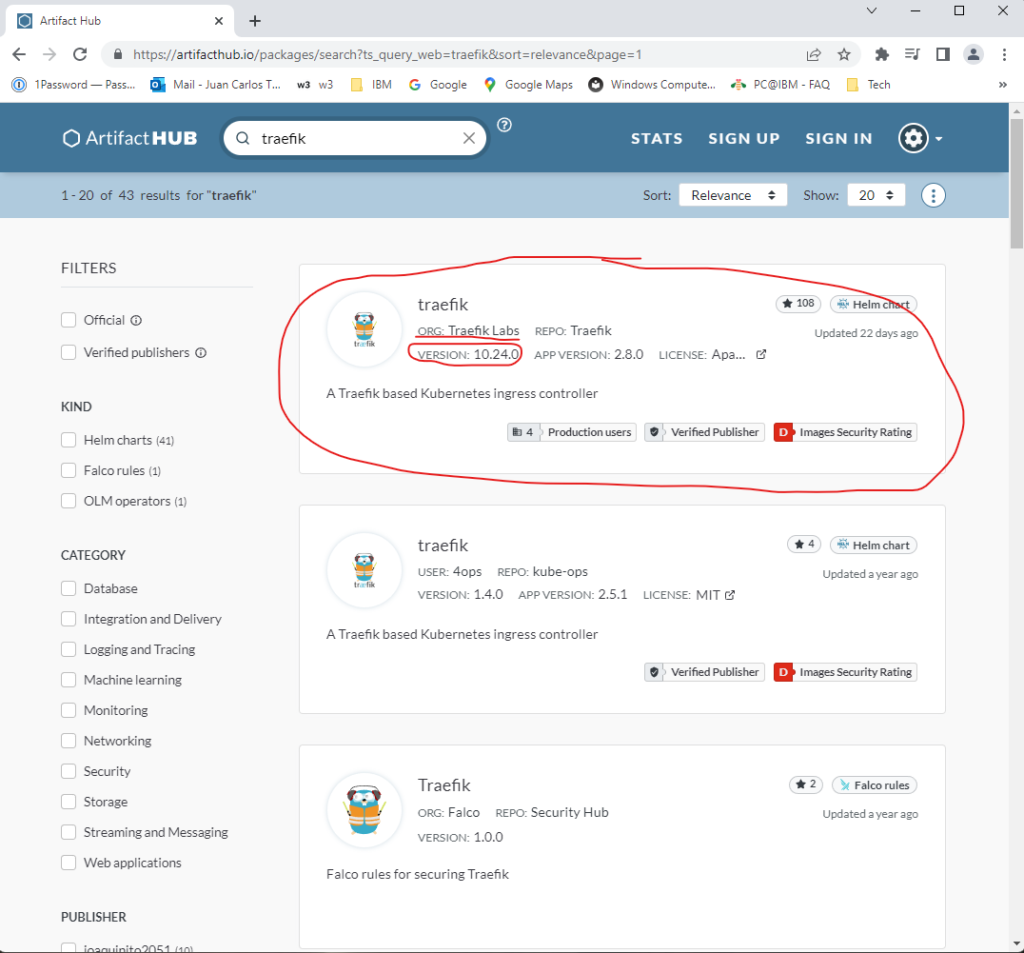
Once you obtain the chart version, set the variable chart_version to the obtained value.
null_resource
Since I did not find an adequate OpenShift provider for Terraform, I’ll use a hack to apply/delete the custom SSC. I’ll use Terraform’s null_resource and its local-exec feature to invoke the oc commands. The null_resource can be used to create Terraform resources that don’t have any particular resource type, and the local-exec is used to invoke commands on the local computer. The timestamp forces the commands to always be invoked.
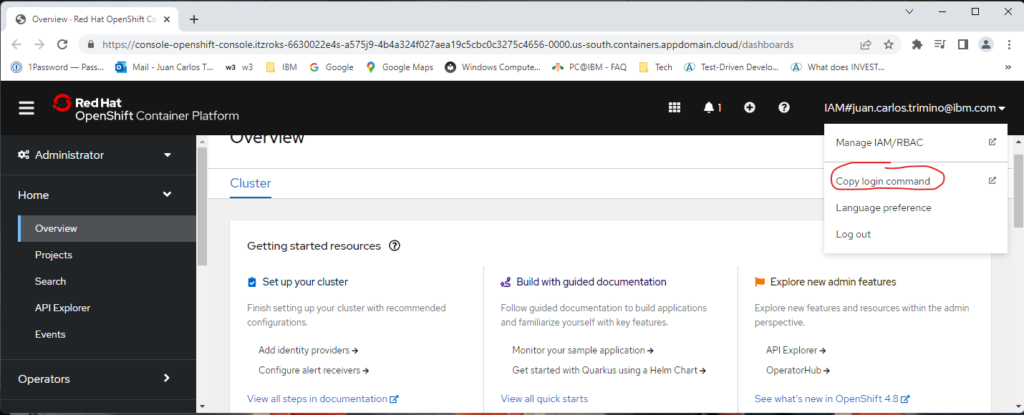
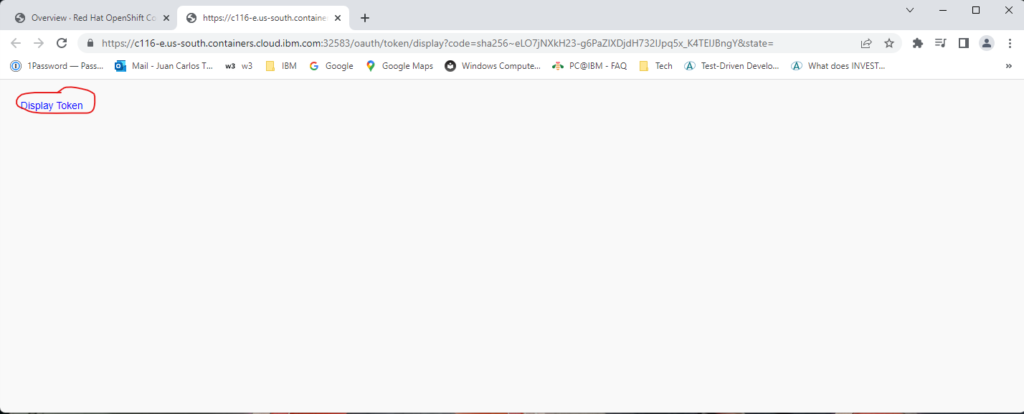
Because my goal is to keep the entire deployment process in Terraform, I’ll use this hack, but once an adequate OpenShift provider is available, this hack can be removed. Nevertheless, in order to apply/delete the custom SCC with this hack, you need to be logged in to your cluster by using the oc login command; otherwise, these commands will fail. Figures 2A-2C show how to obtain the oc command with the appropriate token.

After you execute the oc login command with the appropriate token, the null_resource named scc-traefik will run when creating or destroying a cluster.
ServiceAccount, Role, and RoleBinding
After applying the custom SCC, you’ll create the resources service account, role, and role binding. A ServiceAccount is a namespaced resource that is used by an application running in a pod to authenticate itself with the API server. A default ServiceAccount is automatically created for each namespace, but for cluster security reasons, additional ServiceAccounts can be created. Each pod is associated with one and only one ServiceAccount, but multiple pods can use the same ServiceAccount. If a ServiceAccount is not explicitly assigned to a pod in its manifest, the default ServiceAccount for the namespace will be used by the pod.
Since the default ServiceAccount is not allowed to list or modify the cluster state, you’ll create a ServiceAccount with the proper permissions. You’ll do so by using role-based access control (RBAC). Once the cluster is running, you can inspect the ServiceAccount with the commands that are shown in Figure 3.
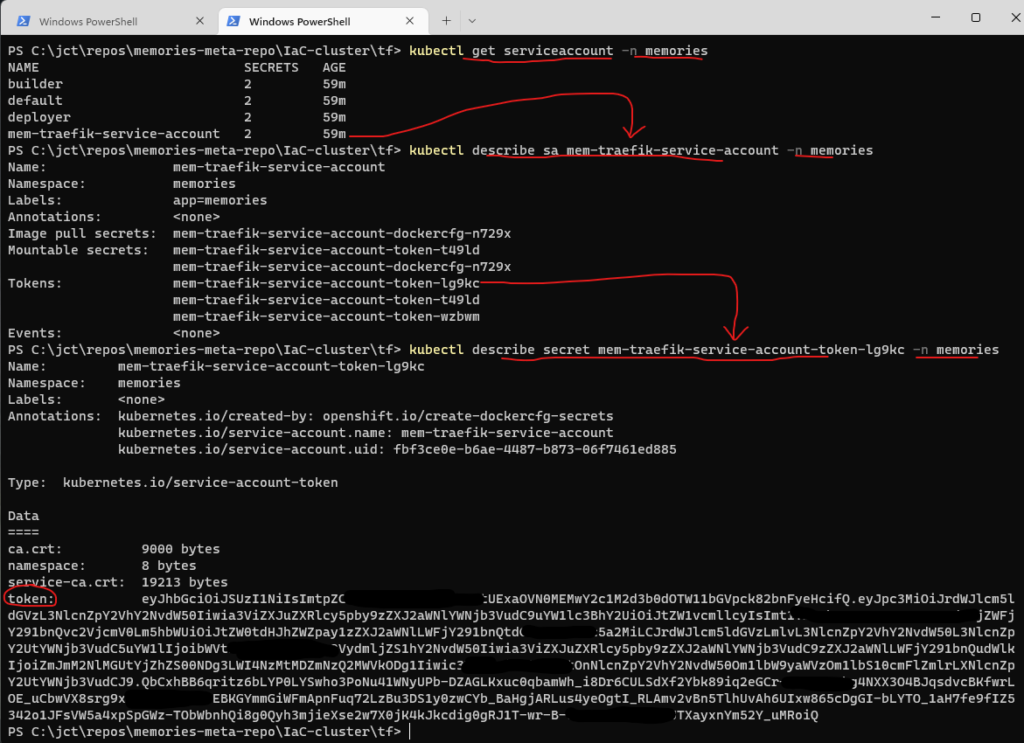
In case you’re wondering, a ServiceAccount uses JSON Web Tokens (JWTs) for its authentication tokens.
The code to create the ServiceAccount resource (service_account) is very simple, but you should try to understand it. After the code for the ServiceAccount, you’ll create the code for the Role and RoleBinding resources. These resources are the base for the RBAC authorization rules, which can be grouped into two (2) groups:
- A Role/ClusterRole resource defines what actions can be taken on which resources (or which types of HTTP requests can be performed on which RESTful resources); or in other words, it specifies which verbs can be performed on which resource. A Role is a namespaced resource.
- A RoleBinding/ClusterRoleBinding resource defines who can perform the actions defined in a Role/ClusterRole. A RoleBinding/ClusterRoleBinding binds a Role/ClusterRole to specific users, groups, or ServiceAccounts. Like a Role, a RoleBinding is a namespaced resource.
Upon closer inspection of the code for the Role resource (role), you’ll find a rule with the fields resources and resource_names and values of securitycontextconstraints and mem-traefik-scc, respectively. This rule adds the custom SCC to the Role; the other rules are there to support Traefik. You would do well to spend time examining these rules since they dictate what actions the ServiceAccount will be able to perform.
Binding the Role to the ServiceAccount is achieved by creating a RoleBinding resource (role_binding). Once created, you have a RoleBinding resource in the namespace memories, which references a Role resource and a ServiceAccount resource in the same memories namespace. At this point, you just need to assign the name of the ServiceAccount to the field pod.spec.serviceAccountName of the pod definition. You’ll do this in a moment.
Finally, you are probably wondering why I used the resources Role/RoleBinding instead of ClusterRole/ClusterRoleBinding. I did so to follow the RBAC good practices; i.e., the resources Role/RoleBinding are namespaced (ClusterRole/ClusterRoleBinding are cluster-level resources), and I wanted to use the least-privilege approach, which requires to give rights only within a specific namespace. In general, this is the preferred approach if the namespaces of the cluster do not change dynamically and Traefik is not required to watch all namespaces of the cluster.
helm_release
A Chart is a Helm package that contains all of the resource definitions necessary to run an application, tool, or service inside of a Kubernetes (in our case OpenShift) cluster. You are installing Traefik version 2 using the official Traefik helm chart repo, which uses the values.yaml file for the startup configuration (referred to as the static configuration). The listing below is an extract from this configuration file with only the values required for the specific usage of Traefik; the changes are highlighted in bold. If you’re interested in learning more about configuring Traefik, this file is a good place to start.
# Default values for Traefik
image:
  name: traefik
  tag: ""
  pullPolicy: IfNotPresent
# Enable api.
# For a list of API enpoints, go to https://doc.traefik.io/traefik/operations/api/#endpoints.
api:
  # Activate dashboard.
  # With Dashboard enabled, the router rule must catch requests for both /api and /dashboard.
  dashboard: true
  insecure: false
# Configure the deployment
deployment:
  enabled: true
  kind: Deployment
  replicas: 1
  terminationGracePeriodSeconds: 60
  minReadySeconds: 0
  shareProcessNamespace: false
# Pod disruption budget
podDisruptionBudget:
  enabled: false
# Use ingressClass. Ignored if Traefik version < 2.3 / kubernetes < 1.18.x
# Set Traefik as the default Ingress Controller (as per Kubernetes 1.19+ changes).
ingressClass:
  enabled: true
  isDefaultClass: true
# Create an IngressRoute for the dashboard.
ingressRoute:
  dashboard:
    # Using a custom ingressRoute with basic auth instead of the default.
    enabled: false
    # Additional ingressRoute annotations (e.g. for kubernetes.io/ingress.class).
    annotations: {}
    # Additional ingressRoute labels (e.g. for filtering IngressRoute by custom labels).
    labels: {}
rollingUpdate:
  maxUnavailable: 1
  maxSurge: 1
# Configure providers.
providers:
  # Enable Kubernetes backend with default settings.
  kubernetes.CRD:
    enabled: true
  # Enable Kubernetes backend with default settings.
  kubernetesIngress:
    enabled: true
    # Value of kubernetes.io/ingress.class annotation or IngressClass name to watch for. See
    # https://cert-manager.io/docs/installation/upgrading/ingress-class-compatibility/#traefik.
    ingressClass: traefik
# Logs
logs:
  access:
    enabled: true
    format: json
    filters:
      statusCode: "200,400-599"
      # Keep the access logs when at least one retry has happened.
      retryAttempts: true
      # Keep access logs when requests take longer than the specified duration.
      minDuration: "10ms"
  general:
    # By default, the level is set to ERROR. Alternative logging levels are DEBUG, PANIC, FATAL, ERROR, WARN, and INFO.
    level: ERROR
# Configure ports
ports:
  traefik:
    port: 9000
    # DO NOT expose the traefik port on production deployments. To access it from outside of the
    # cluster, use `kubectl port-forward` or create a secure ingress.
    # $ kubectl port-forward -n memories $(kubectl get pods -n memories --selector "app.kubernetes.io/name=traefik" --output=name) 9000:9000
    # From a browser, use http://127.0.0.1:9000/dashboard/ to see the Traefik dashboard; the trailing slash / in /dashboard/ is mandatory.
    expose: false
    # The exposed port for this service.
    exposedPort: 9000
    protocol: TCP
  web:
    port: 8080  # Traefik port.
    expose: true
    exposedPort: 80
    protocol: TCP
  websecure:
    port: 8443
    expose: true
    exposedPort: 443
    protocol: TCP
  metrics:
    port: 9100
    expose: false
    # The exposed port for this service.
    exposedPort: 9100
    protocol: TCP
# For a list of annotations, go to
# https://doc.traefik.io/traefik/routing/providers/kubernetes-ingress/#annotations
entryPoints:
  # Traefik will listen to incoming request on the port 80 (http).
  web:
    address: ':80'
  # Traefik will listen to incoming request on the port 443 (https).
  websecure:
    address: ':443'
# Options for the main traefik service, where the entrypoints traffic comes
# from.
service:
  enabled: true
  type: LoadBalancer
  # Additional annotations applied to both TCP and UDP services (e.g. for cloud provider specific config)
  annotations: {}
  # Additional annotations for TCP service only
  annotationsTCP: {}
  # Additional annotations for UDP service only
  annotationsUDP: {}
  # Additional service labels (e.g. for filtering Service by custom labels)
  labels: {}
  # Additional entries here will be added to the service spec.
  # Cannot contain type, selector or ports entries.
  spec: {}
  loadBalancerSourceRanges: []
  externalIPs: []
# Create HorizontalPodAutoscaler object.
#
autoscaling:
  enabled: false
# If hostNetwork is true, runs traefik in the host network namespace
# To prevent unschedulabel pods due to port collisions, if hostNetwork=true
# and replicas>1, a pod anti-affinity is recommended and will be set if the
# affinity is left as default.
hostNetwork: false
# Whether Role Based Access Control objects like roles and rolebindings should be created.
rbac:
  enabled: true
  # If set to false, installs ClusterRole and ClusterRoleBinding so Traefik can be used across
  # namespaces.
  # If set to true, installs namespace-specific Role and RoleBinding and requires provider
  # configuration be set to that same namespace.
  namespaced: true
# Enable to create a PodSecurityPolicy and assign it to the Service Account via RoleBinding or ClusterRoleBinding
podSecurityPolicy:
  enabled: false
# The service account the pods will use to interact with the Kubernetes API.
serviceAccount:
  # If set, an existing service account is used.
  # If not set, a service account is created automatically using the fullname template.
  # name: ""
  name: "mem-traefik-service-account"
# QoS (Guaranteed).
resources:
  # requests:
  #   cpu: "500m"
  #   memory: "150Mi"
  limits:
    cpu: "500m"
    memory: "500Mi"
# Set the container security context.
# To run the container with ports below 1024 this will need to be adjust to run as root.
securityContext:
  capabilities:
    drop: [ALL]
  readOnlyRootFilesystem: true
  runAsGroup: 1234
  runAsNonRoot: true
  runAsUser: 1234
podSecurityContext:
  fsGroup: 1234
As per the listing above, these are some of the default values:
- Traefik will be deployed in LoadBalancer mode.
- EntryPoints are the network entry points into Traefik. They define the port which will receive the packets, and whether to listen for TCP or UDP.
- web: It is used for all HTTP requests. The Kubernetes LoadBalancer service maps port 80 to the web entrypoint.
- websecure: It is used for all HTTPS requests. The Kubernetes LoadBalancer service maps port 443 to the websecure entrypoint.
- traefik: Kubernetes uses the Traefik Proxy entrypoint for pod liveliness check. The Traefik dashboard and API are available on the Traefik entrypoint.
- Applications are configured either on the web or the websecure entrypoints.
- web – port 8080 (exposed as port 80)
- websecure – port 8443 (exposed as port 443)
- traefik – port 9000 (not exposed)
- metrics – port 9100 (not exposed)
module “middleware-dashboard-basic-auth”
In Traefik, middlewares are attached to routers as a means of tweaking the requests before they are forwarded to the appropriate service or before the answers from the service are sent to the client. The middleware for the dashboard uses basic authentication to restrict access to the services to known users. For this deployment, you’ll use the file from the repo without making any changes.
Note: HTTP Basic Authentication is a simple challenge/response mechanism with which a server can request authentication information (a user ID and password) from a client. The client passes the authentication information to the server in an Authorization header. The authentication information is base-64 encoded; it is not encrypted.
This scheme can be considered secure only when the connection between the web client and the server is secure. If the connection is insecure, the scheme does not provide sufficient security to prevent unauthorized users from discovering the authentication information for a server. If you think that the authentication information might be intercepted, use basic authentication with SSL/TLS encryption to protect the user ID and password. (In Part 4, you’ll use SSL/TLS to secure the user ID and password.)
The code for the middleware is self-explanatory, but you should pay close attention to how the secret is created using the user ID and password. Traefik supports passwords hashed with MD5, SHA1, or BCrypt; the secret resource uses the bcrypt function, which is included as part of Terraform’s built-in functions. You should keep in mind that a bcrypt hash value includes a randomly selected salt, and, therefore, each call to this function will return a different value, even if the given string and cost are the same.
And just as a side note, you can use the htpasswd utility from the command line to encrypt a password. You must install (the instructions below are for ubuntu) the utility, which is part of the apache2-utils package to manage usernames and passwords.
$ sudo apt update
$ sudo apt install apache2-utils

The output of the utility will be piped to openssl for base64 encoding.
$ htpasswd -nbB <username> <password> | openssl base64

To verify the output.
$ echo <Output from htpasswd> | base64 -d
module “whoami”
This module uses a simple web service that outputs OS information and HTTP request. You’ll be using this application as a placeholder for the memories application to demonstrate how Traefik routes requests. Of course, if you wish not to implement this module, just remove the module from the bootstrap.tf file above. Either way, you should try to understand the code as it forces changes to the custom SCC file specifying the security features that the service requires.
In the code fragment that follows, you are creating the ServiceAccount, Role, and RoleBinding resources. In the Role resource, the rule section sets our custom SCC file to the role thereby determining what actions can be performed. And in the RoleBinding resource, the role is bound to the service account thereby determining who can perform the actions.
...
resource "kubernetes_service_account" "service_account" {
  metadata {
    name = "${var.service_name}-service-account"
    namespace = var.namespace
    labels = {
      app = var.app_name
    }
  }
}

resource "kubernetes_role" "role" {
  ...
  rule {
    api_groups = ["security.openshift.io"]
    verbs = ["use"]
    resources = ["securitycontextconstraints"]
    resource_names = ["mem-traefik-scc"]
  }
}

resource "kubernetes_role_binding" "role_binding" {
  ...
  # A RoleBinding always references a single Role, but it can bind the Role to multiple subjects.
  role_ref {
    api_group = "rbac.authorization.k8s.io"
    kind = "Role"
    # This RoleBinding references the Role specified below...
    name = kubernetes_role.role.metadata[0].name
  }
  # ... and binds it to the specified ServiceAccount in the specified namespace.
  subject {
    # The default permissions for a ServiceAccount don't allow it to list or modify any resources.
    kind = "ServiceAccount"
    name = kubernetes_service_account.service_account.metadata[0].name
    namespace = kubernetes_service_account.service_account.metadata[0].namespace
  }
}
...
In the next fragment of the same file, you create the Deployment resource. Here you assign the service account to the pod thereby setting the security constraints as defined in the associated role. By the way, failure to do so results in the pod using the default service account that was assigned to the namespace when the namespace was created. You further define the security context of the container; here you set some fields to false and add the NET_BIND_SERVICE capability to allow the use of privileged ports (< 1024).
...
resource "kubernetes_deployment" "deployment" {
  ...
  # The Deployment's specification.
  spec {
    ...
    # The Pod template.
    template {
      ...
      # The Pod template's specification.
      spec {
        service_account_name = kubernetes_service_account.service_account.metadata[0].name
        container {
          ...
          # Specifying ports in the pod definition is purely informational. Omitting them has no
          # effect on whether clients can connect to the pod through the port or not.
          port {
            container_port = var.service_target_port  # The port the app is listening.
            protocol = "TCP"
          }
          security_context {
            read_only_root_filesystem = false
            allow_privilege_escalation = false
            capabilities {
              add = ["NET_BIND_SERVICE"]
            }
          }
        }
      }
    }
  }
}
...
Note: On transport protocols such as TCP and UDP, ports [1, 1023] are by default privileged ports. To bind to a privileged port, a process must be running with root permissions; ports that are greater than 1023 are by default non-privileged.
Next, you’ll change the custom SCC file. Since the web service uses port 80, you’ll need to change the custom SCC file to allow a non-root process to bind to a privileged port. Furthermore, you’ll add the service account created above to the list of users. To make the changes, you’ll replace the two lines below
...
allowedCapabilities: [
]
...
users: [
  system:serviceaccount:memories:mem-traefik-service-account
]
...
with these two lines.
...
allowedCapabilities: [
  # Bind a socket to Internet domain privileged ports (port numbers less than 1024).
  NET_BIND_SERVICE
]
...
users: [
  system:serviceaccount:memories:mem-traefik-service-account,system:serviceaccount:memories:mem-whoami-service-account
]
...
module “ingress-route”
An Ingress (entryway) exposes HTTP and HTTPS routes from outside the cluster to services within the cluster. Traffic routing is controlled by rules defined on the Ingress resource. An Ingress operates at the application layer of the network stack (for example HTTP) and can provide features that a service cannot. But in order to make an Ingress resource work, an Ingress controller needs to be running in the cluster. Different Kubernetes environments use different implementations of the controller, but several do not provide a controller at all; e.g., OpenShift uses an Ingress controller that is based on HAProxy. You, of course, are using Traefik.
The listing below was extracted from the file for the ingress in the repo. In this listing, the routes are use by Traefik to forward the requests to the middlewares, if any, and services, as defined in each Rule. If you are interested in learning more about Traefik, you should take the time to study this code and the appropriate documentation.
/***
-------------------------------------------------------
A Terraform reusable module for deploying microservices
-------------------------------------------------------
Define input variables to the module.
***/
variable app_name {
  type = string
}
variable namespace {
  type = string
}
variable middleware_dashboard_basic_auth {
  type = string
}
variable host_name {
  type = string
}
variable service_name {
  type = string
}

resource "kubernetes_manifest" "ingress-route" {
  manifest = {
    apiVersion = "traefik.containo.us/v1alpha1"
    # This CRD is Traefik-specific.
    kind = "IngressRoute"
    metadata = {
      name = var.service_name
      namespace = var.namespace
      labels = {
        app = var.app_name
      }
    }
    #
    spec = {
      # If not specified, HTTP routers will accept requests from all defined entry points. If you
      # want to limit the router scope to a set of entry points, set the entryPoints option.
      # Traefik handles requests using the web (HTTP) and websecure (HTTPS) entrypoints.
      entryPoints = [  # Listening ports.
        "web",
        "websecure"
      ]
      routes = [
        {
          kind = "Rule"
          match = "Host(`${var.host_name}`, `www.${var.host_name}`) && (PathPrefix(`/dashboard`) || PathPrefix(`/api`))"
          priority = 40
          middlewares = [
            {
              name = var.middleware_dashboard_basic_auth
              namespace = var.namespace
            }
          ]
          services = [
            {
              kind = "TraefikService"
              # If you enable the API, a new special service named api@internal is created and can
              # then be referenced in a router.
              name = "api@internal"
              port = 9000  # K8s service.
              # (default 1) A weight used by the weighted round-robin strategy (WRR).
              weight = 1
              # (default true) PassHostHeader controls whether to leave the request's Host Header
              # as it was before it reached the proxy, or whether to let the proxy set it to the
              # destination (backend) host.
              passHostHeader = true
              responseForwarding = {
                # (default 100ms) Interval between flushes of the buffered response body to the
                # client.
                flushInterval = "100ms"
              }
              strategy = "RoundRobin"
            }
          ]
        },
        {
          kind = "Rule"
          match = "Host(`${var.host_name}`, `www.${var.host_name}`) && Path(`/whoami`)"
          priority = 30
          services = [
            {
              kind = "Service"
              name = "mem-whoami"
              namespace = var.namespace
              port = 80  # K8s service.
              weight = 1
              passHostHeader = true
              responseForwarding = {
                flushInterval = "100ms"
              }
              strategy = "RoundRobin"
            }
          ]
        }
      ]
    }
  }
}
variables_no_push.tf
As mentioned in Part 2, this file is a copy of the template file variables_no_push.tf.template. For the purpose at hand, you’ll add the user ID and password variables to support basic authentication for the Traefik dashboard.
#############################################################################################################
# Usage Note:                                                                                               #
# (1) Make a copy of this file.                                                                             #
# (2) Rename the file to "variables_no_push.tf".                                                            #
#     Renaming the file to "variables_no_push.tf" will ensure that the file will not be pushed to the repo. #
# (3) In the "variables_no_push.tf" file, add the appropriate information to each variable.                 #
#############################################################################################################
# IMPORTANT: Because the variables_no_push.tf file contains confidential information, do not push this file #
#            to a version control system. This file is meant to be on your local system only.               #
#############################################################################################################
# GLOBAL VARIABLES #
####################
variable ibmcloud_api_key {
  description = "The IBM Cloud platform API key."
  default = "*******************************"
  sensitive = true
}

variable cluster_name {
  description = "The name of an existing IBM Cloud cluster."
  default = "*********************"
  sensitive = true
}

variable resource_group_name {
  description = "The name of the IBM Cloud resource group in which resources should be created."
  default = "***********"
  sensitive = true
}

variable region {
  description = "The IBM Cloud region where all resources will be deployed; e.g., us-south, eu-de, etc."
  default = "*********"
  sensitive = true
}

variable ibmcloud_timeout {
  description = "The timeout, expressed in seconds, for interacting with IBM Cloud APIs."
  default = "900"
  sensitive = true
}

###########
# Traefik #
###########
variable traefik_dashboard_username {
  default = "**********"
  sensitive = true
}

variable traefik_dashboard_password {
  default = "**********"
  sensitive = true
}
Building and Deploying Traefik
At this point, you are ready to build and bootstrap your app. But before you invoke Terraform to execute your scripts, you must initialize Terraform, but to do so, you must be in the directory that contains the code. Once in the directory, execute
PS C:\jct\repos\memories-meta-repo\IaC-cluster\tf> terraform initBecause you installed Traefik version 2 using the official Traefik helm chart repo, Custom Resource Definitions (CRDs) were used. To create arbitrary Kubernetes resources in a cluster, particularly CRDs, you must use the kubernetes_manifest resource from the Kubernetes provider, but with these limitations:
- This resource requires API access during the planning time. This means the cluster has to be accessible at plan time and thus cannot be created in the same apply operation. That is, it is required to use two (2) separate Terraform apply steps: (1) Provision the cluster; (2) Create the resource.
- Any CRD must already exist in the cluster during the planning phase. That is, it is required to use two (2) separate Terraform apply steps: (1) Install the CRDs; (2) Install the resources that are using the CRDs.
It is for these reasons that I am using the two-step process to build and bootstrap our app. Truth be told, there are workarounds, but since this is an issue that Terraform needs to fix, I made the decision to use this process until this issue is fixed.
After initializing Terraform, you’ll execute any one of the two commands below (they are equivalent since the default value for the variable k8s_manifest_crd is true; see variables.tf)
PS C:\jct\repos\memories-meta-repo\IaC-cluster\tf> terraform apply -var="app_version=1.0.0" -auto-approveor
PS C:\jct\repos\memories-meta-repo\IaC-cluster\tf> terraform apply -var="app_version=1.0.0" -var="k8s_manifest_crd=true" -auto-approveIn case you are wondering how the flag is used, a quick look at the bootstrap.tf file and a brief explanation will reveal its usage. At the beginning of every module, with the exception of traefik, you’ll find one of these two statements
count = var.k8s_manifest_crd ? 1 : 0or
count = var.k8s_manifest_crd ? 0 : 1In the first statement, if the flag is true, the module will be executed once; otherwise, the function will not be executed. The reverse is the case in the second statement; it will be executed once when the flag is false; otherwise, it will not. Because Terraform does not support the if statement, I am using count, which is a meta-argument defined by Terraform, and the conditional expression to achieve the same result. A simple but useful trick!
After successfully executing the command above, an external IP address will be assigned to Traefik. You’ll need to set the host_name variable in the ingress-route module to this address. (When using a domain name, this step is not required.) To execute the following command, you must be logged in to the cluster. As Figure 4 shows, if you execute the command kubectl get all -n memories, you’ll obtain the external IP address.
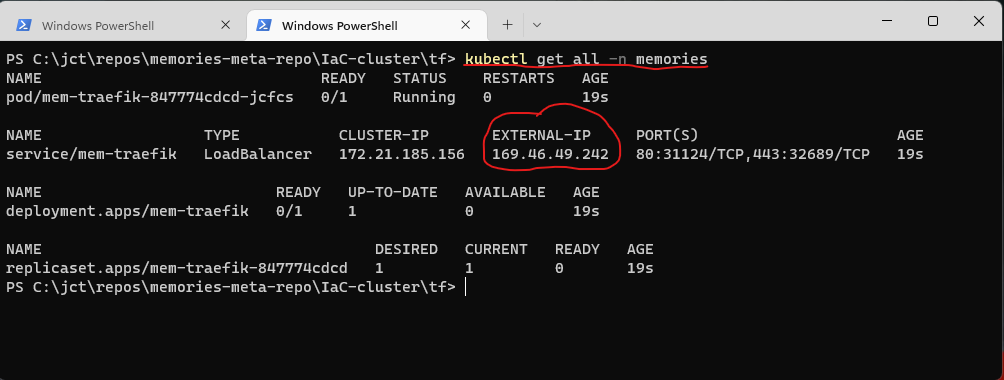
You’ll then set host_name = 169.46.49.242.nip.io.
Once the CRDs are created, execute the second command
PS C:\jct\repos\memories-meta-repo\IaC-cluster\tf> terraform apply -var="app_version=1.0.0" -var="k8s_manifest_crd=false" -auto-approveIf this command succeeds, the application is up and running. Once Traefik is running, you can watch its log by executing
PS C:\jct\repos\memories-meta-repo\IaC-cluster\tf> kubectl logs -n memories -l app.kubernetes.io/name=traefik -fTyping Ctrl+C will interrupt the output.
With the application running, you can invoke the application by opening a browser as shown in Figure 5.

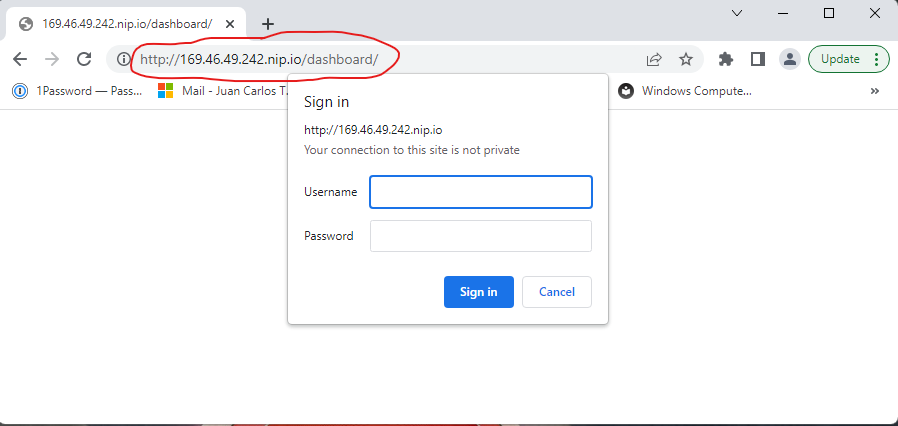
You can also login to the dashboard; open a browser as show in Figure 6.
After typing the user ID and password (see the variables_no_push.tf file above), click on the Sign in button, and you’ll see the dashboard as shown in Figure 7.
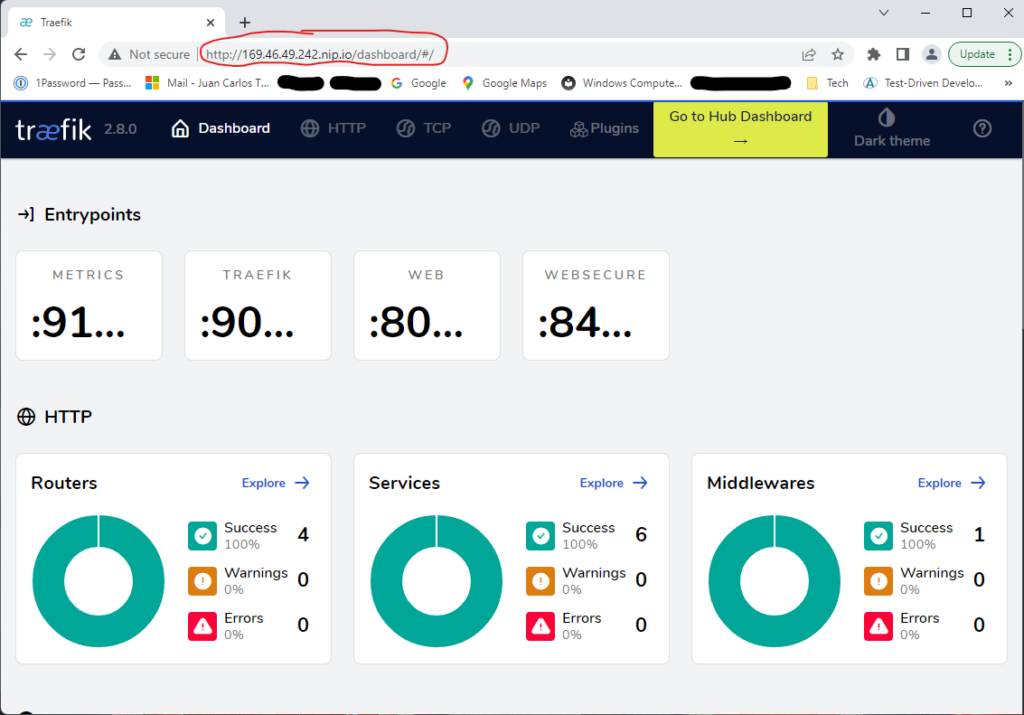
Et factum!
Conclusion
Wow! What a journey. What have you achieved? Well, you created a custom SCC to use in the deployment of Traefik. You installed Traefik using the official Traefik helm chart repo and setup the values.yaml file with the startup configuration; you created a middleware for the dashboard using basic authentication and an ingress to expose HTTP and HTTPS routes from outside the cluster to services within the cluster. Finally, you created a web service application to test Traefik. And, of course, you deployed the application using Terraform. What’s next? In Part 4, you’ll continue to learn about interacting with Kubernetes (OpenShift) through Terraform code, and you’ll be deploying Cert-Manager and Let’s Encrypt to secure the cluster.
I would like to thank you for the efforts youve put in penning this site. I really hope to view the same high-grade content by you later on as well. In fact, your creative writing abilities has inspired me to get my own website now 😉
Hello, Jack speaking. I’ve bookmarked your site and make it a habit to check in daily. The information is top-notch, and I appreciate your efforts.