Introduction
If you have not already done so, please visit Part 1 of this series for a brief introduction to the app, tools requirement, and access to the code. In Part 2, you’ll continue with the project by using Terraform to build the OpenShift infrastructure. With this technique, which is known as Infrastructure as Code (IaC), you store the infrastructure configuration as code, and the infrastructure is created and updated by editing and executing that code.
Since Terraform is a declarative and not a procedural language, you simply describe the configuration of the infrastructure instead of the step-by-step instructions for building it; i.e., you describe the intended goal rather than the steps to reach that goal. Infrastructure as Code allows you to reliably and repeatedly create the infrastructure and to automate the creation and maintenance of it. The alternative, of course, is to build the infrastructure manually by either using the Graphical User Interface (GUI) or Command Line Interface (CLI) from the cloud vendor.
Installing Terraform
Since Terraform is open source, you can download the code from here. To install Terraform, you download the binary executable for your Operating System and move it to a directory that’s included in your system’s PATH environment variable. For the latest version of Terraform, go here. Once Terraform is installed, you may run the command below to ensure that it is running.
PS C:\> terraform --versionAt the time of writing, I am using Terraform v1.2.4 on windows_amd64; future versions should be backward compatible. But before you get started, let’s familiarize ourselves with the .gitignore file as use in this project.
A Word About .gitignore
Since I want to avoid pushing unnecessary or sensitive files to the repos, I begin every .gitignore file by ignoring everything; i.e., by not pushing any files or directories. Then, I explicitly select the files and directories to push as per below comments in blue.
# Ignore everything.
**  #1 Ignore everything

# But include these files...
!.gitignore  #2 Push these files
!LICENSE
!README.md

# ... and these files under the 'tf' directory...
!tf/         #3 Push this directory and everything under it
tf/*         #3 IGNORE everything under this directory (only push an empty directory)
!tf/cert-manager.tf  #3 Push these files under the directory
!tf/data.tf
!tf/ELK.tf
...
With care, this technique will reduce or eliminate pushing unnecessary or sensitive files to the repos. And now, let’s setup our infrastructure using Terraform.
IaC with Terraform
The IaC tools allow the managing of infrastructures with configuration files rather than manually through the GUI or the CLI. IaC allows to build, change, and manage infrastructures in a safe, consistent, and repeatable way by defining resource configurations that can be versioned, reused, and shared.
Terraform is HashiCorp’s IaC tool. It defines resources and infrastructure in human-readable, declarative configuration files, and manages the infrastructure’s lifecycle. The syntax of Terraform is similar to YAML or JSON, but with slightly different syntax designed to be relatively easy for humans to read and write. In this project, we are using Terraform to create resources on an IBM Cloud infrastructure using OpenShift.
Terraform Project
A Terraform project is composed of a number of Terraform code files with .tf extensions. These files contain the Terraform code that, when executed by Terraform, creates the infrastructure for the application. The Terraform code to build the cluster infrastructure is located in the IaC-cluster repo under the tf directory. This directory contains quite a few Terraform files, but this is to be expected since these files are required for building the infrastructure as well as for bootstrapping the app. But don’t worry, I am going to explain each file when its use is required. Let’s start by examining the files that are required to setup the infrastructure.
Finally, please note that the file structure and file names, as used here, were not dictated by Terraform, but it was simply the convention that I used. Terraform does require a file extension of .tf for each of its code file.
Providers File
Terraform supports multiple cloud vendors through provider plugins. The file providers.tf contains configurations for the provider plugins as well as the connection and authentication details for the infrastructure and Kubernetes cluster. For more information about the providers, see IBM provider, Kubernetes provider, null provider, and helm provider.
Data File
The file data.tf contains the resource group for the infrastructure; the resource group is created when the cluster is provisioned. But since the cluster was not provisioned via the Terraform scripts (the internal IBM account that I am using does not allow provisioning clusters), you’ll get the resource group name from the IBM Cloud web console.

The resource group is a way for you to organize the account resources in customizable groupings so that you can quickly assign users access to multiple resources at a time. For more information, see IBM resource group.
Namespace File
In Kubernetes (K8s), namespaces provides a mechanism for isolating groups of resources within a single cluster, but in OpenShift, a project is a K8s namespace with additional annotations. The namespace is defined in the file namespace.tf.
Variables File
The file variables.tf defines global variables that are shared among the files with Terraform code. At the moment, the file contains three (3) variables with one variable requiring an explanation; the other two variables are self-explanatory. The variable that requires an explanation is k8s_manifest_crd, but I’ll wait until Custom Resource Definitions (CRDs) are used in Part 3 to explain its usage; for now, k8s_manifest_crd can be ignored.
The file variables_no_push.tf.template is also used for global variables, but this file is a template for sensitive information (DO NOT POPULATE THIS FILE WITH SENSITIVE INFORMATION!!!). Instead, you make a copy of this file and rename the file variables_no_push.tf; then you populate the file with the appropriate information. As explained in the file variables_no_push.tf.template, the file variables_no_push.tf will not be pushed to the repo.
#############################################################################################################
# Usage Note:                                                                                               #
# (1) Make a copy of this file.                                                                             #
# (2) Rename the file to "variables_no_push.tf".                                                            #
#     Renaming the file to "variables_no_push.tf" will ensure that the file will not be pushed to the repo. #
# (3) In the "variables_no_push.tf" file, add the appropriate information to each variable.                 #
#############################################################################################################
# IMPORTANT: Because the variables_no_push.tf file contains confidential information, do not push this file #
#            to a version control system. This file is meant to be on your local system only.               #
#############################################################################################################
# GLOBAL VARIABLES #
####################
variable ibmcloud_api_key {
  description = "The IBM Cloud platform API key."
  default = "<required>"
  sensitive = true
}

variable cluster_name {
  description = "The name of an existing IBM Cloud cluster."
  default = "<required>"
  sensitive = true
}

variable resource_group_name {
  description = "The name of the IBM Cloud resource group in which resources should be created."
  default = "<required>"
  sensitive = true
}

variable region {
  description = "The IBM Cloud region where all resources will be deployed; e.g., us-south, eu-de, etc."
  default = "<required>"
  sensitive = true
}

variable ibmcloud_timeout {
  description = "The timeout, expressed in seconds, for interacting with IBM Cloud APIs."
  default = "900"
  sensitive = true
}
Values for the Variables
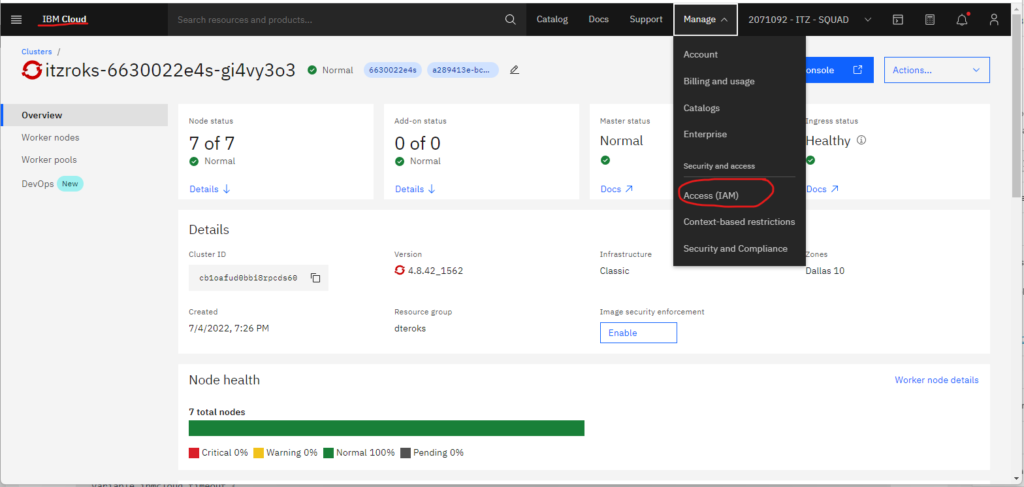
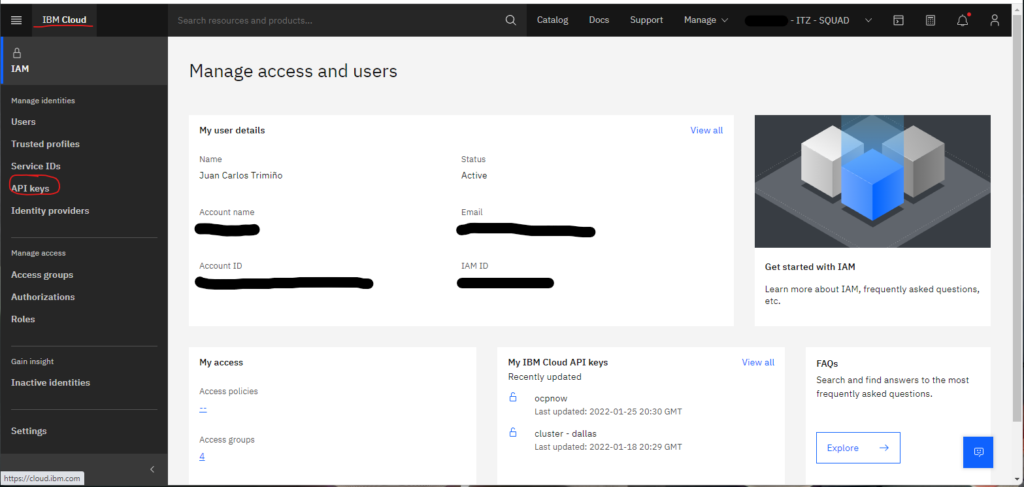
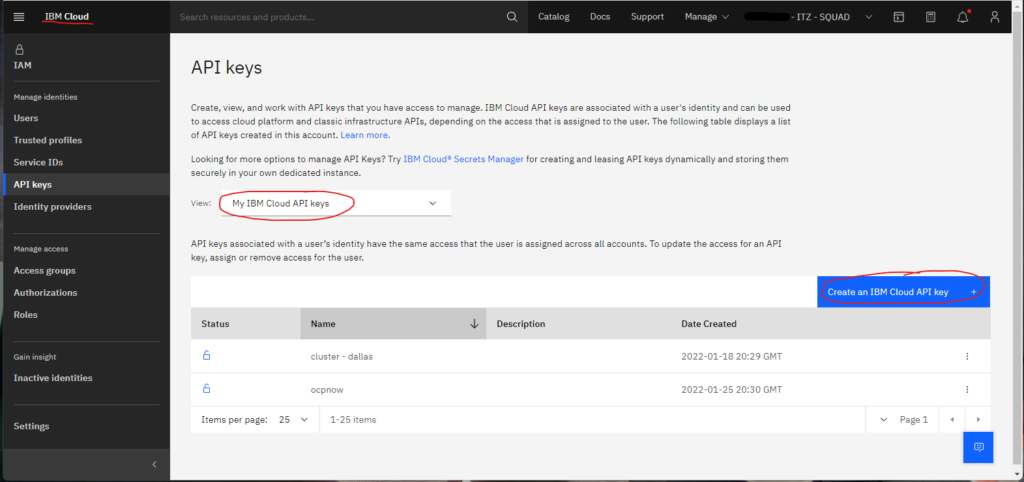
These variables are required and must be obtained from the cluster. To obtain the resource group name, see Figure 1 above. Figures 2A-2C below shows how to obtain the IBM Cloud API key.
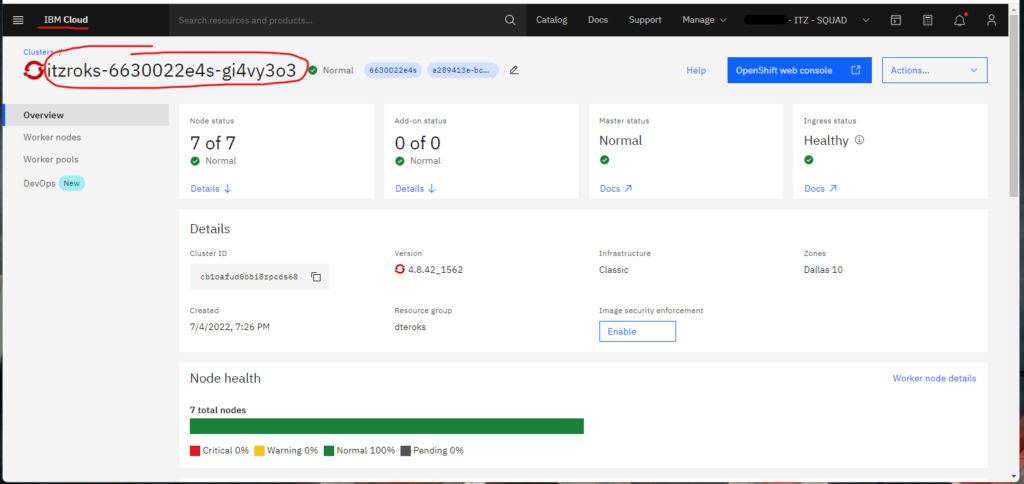
Finally, the cluster name is obtained as described in Figure 3 below.
Building Our OpenShift Infrastructure with Terraform
To build the OpenShift cluster with Terraform, you’ll need the following files:
- data.tf
- namespace.tf
- providers.tf
- variables.tf
- variables_no_push.tf (For now, it only requires the variables listed in the Variables section above.)
Terraform Commands
Below you’ll find the most important commands that you’ll use when building the OpenShift resources and bootstrapping the app.
init
Before you invoke Terraform and execute the scripts, you must initialize Terraform. When you initialize Terraform, the provider plugins are downloaded and the modules are initialized (more on modules in Part 3). It is safe to run this command multiple times, but to initialize Terraform, you must be in the directory that contains the Terraform code. Once in the directory, run
PS C:\jct\repos\memories-meta-repo\IaC-cluster\tf> terraform initWhen the init command is invoked, you’ll see output similar to this
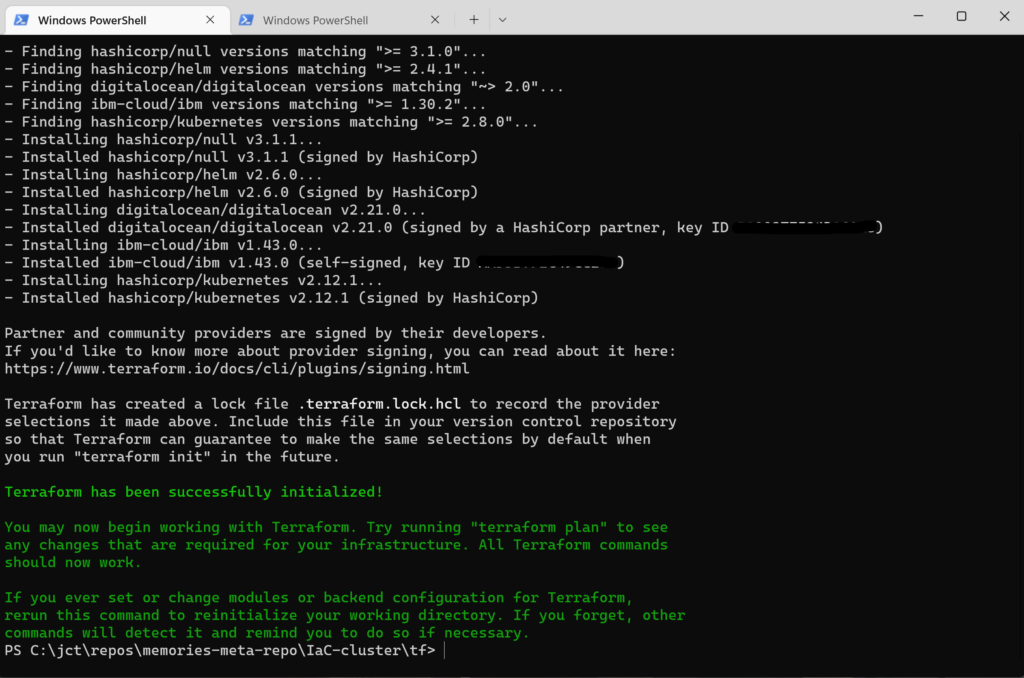
After invoking the init command, Terraform generated a hidden subdirectory, .terraform, and a hidden file, .terraform.lock.hcl.
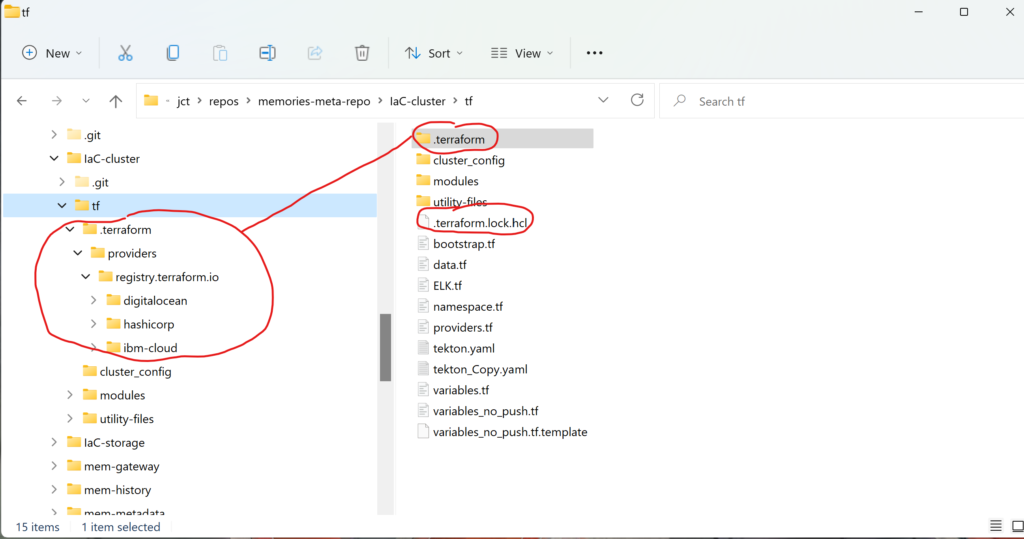
As you can see from Figure 5, Terraform stores the provider plugins that it has downloaded in the hidden subdirectory for use whenever Terraform is invoked in the future. Terraform uses the dependency lock file to track and select provider versions.
apply
After initializing the Terraform project, you’ll invoke the apply command to execute the Terraform code and build the first iteration of the infrastructure. From the same directory where you invoked the init command, run
PS C:\jct\repos\memories-meta-repo\IaC-cluster\tf> terraform apply -var="app_version=1.0.0" -auto-approveNote: You are using the -auto-approve command-line option with the apply command. Enabling automatic approval puts the Terraform project in automatic mode; no human intervention is required. Without this option, Terraform will wait for you to approve the plan before it continues to make the update to the infrastructure. This option is required if you need to invoke Terraform in an automated and unattended manner; e.g., a Continuous Delivery (CD) pipeline.
When you invoke the apply command, the output will be similar to this
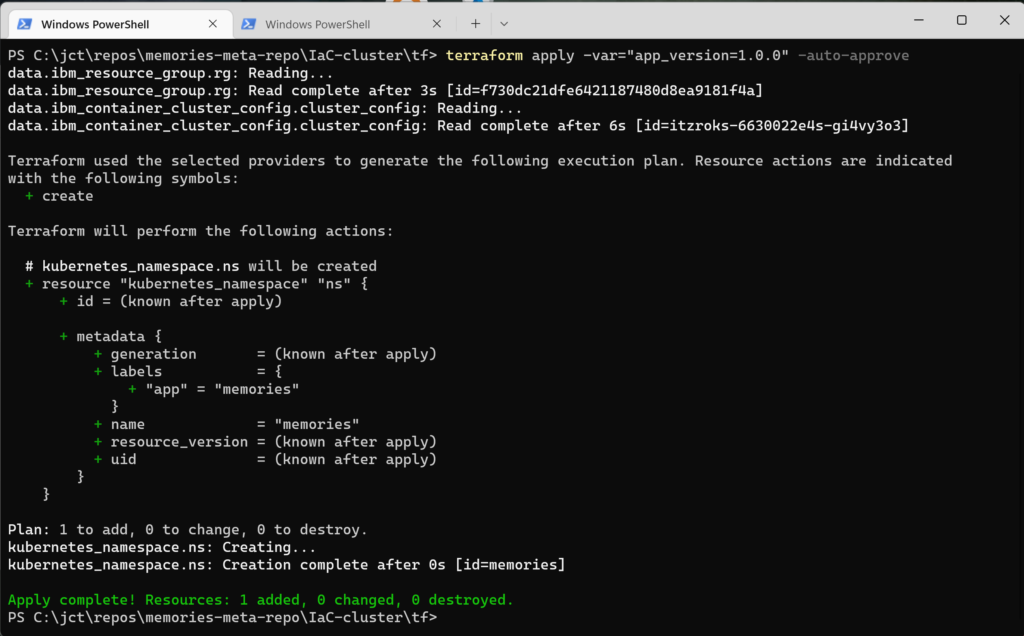
The output describes the update to the infrastructure; i.e., Terraform is informing you of the changes made. The last line of the output (in green) gives a quick summary of what was added, changed, and destroyed. Because these scripts were small, they executed extremely fast, but as you add more code, the execution time will increase considerably.
After invoking the apply command, Terraform generated the files terraform.tfstate and terraform.tfstate.backup.
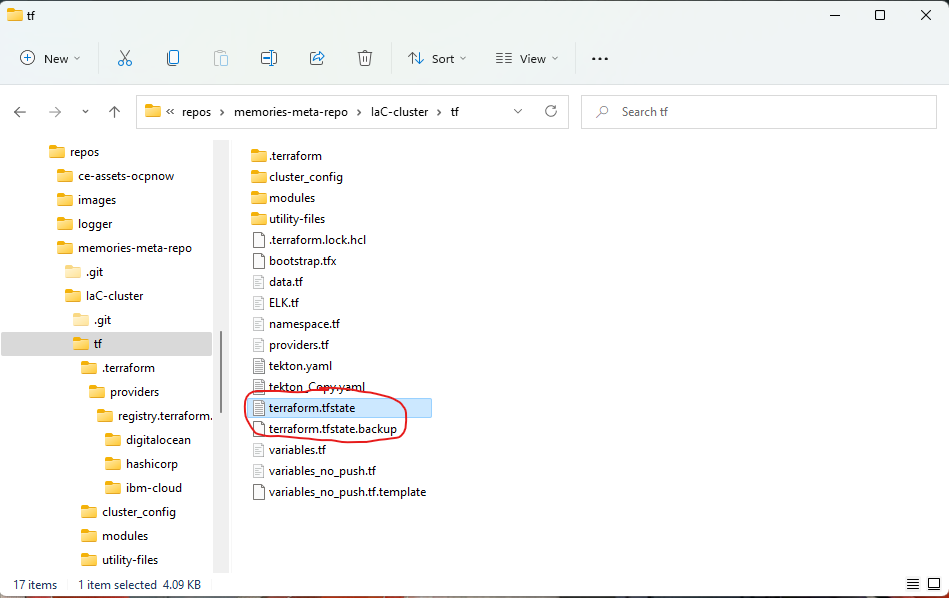
Terraform uses the file terraform.tfstate to store the state of the infrastructure; furthermore, to protect against corruption or deletion of the state file, it is backup to the file terraform.tfstate.backup. When you invoke the apply command for the first time, the state file is generated. Subsequent invocations of the apply command use the state file as input. Terraform loads the state file, and then Terraform refreshes it from the live infrastructure. If you like to display the context of the file terraform.tfstate, run

For you to work effectively with Terraform, it is important that you understand the Terraform state. Terraform will only query the parts of the live infrastructure for which is responsible; i.e., the parts recorded in the state file. As you add, update, and delete the infrastructure, this understanding becomes crucial.
destroy
Now that the infrastructure is bootstrapped, how do you destroy it? To destroy the infrastructure (since you did not provision the cluster, it will not be destroyed!!!), run
PS C:\jct\repos\memories-meta-repo\IaC-cluster\tf> terraform destroy -var="app_version=1.0.0" -auto-approveWhen it is executed, the destroy command produces output that will look something like this
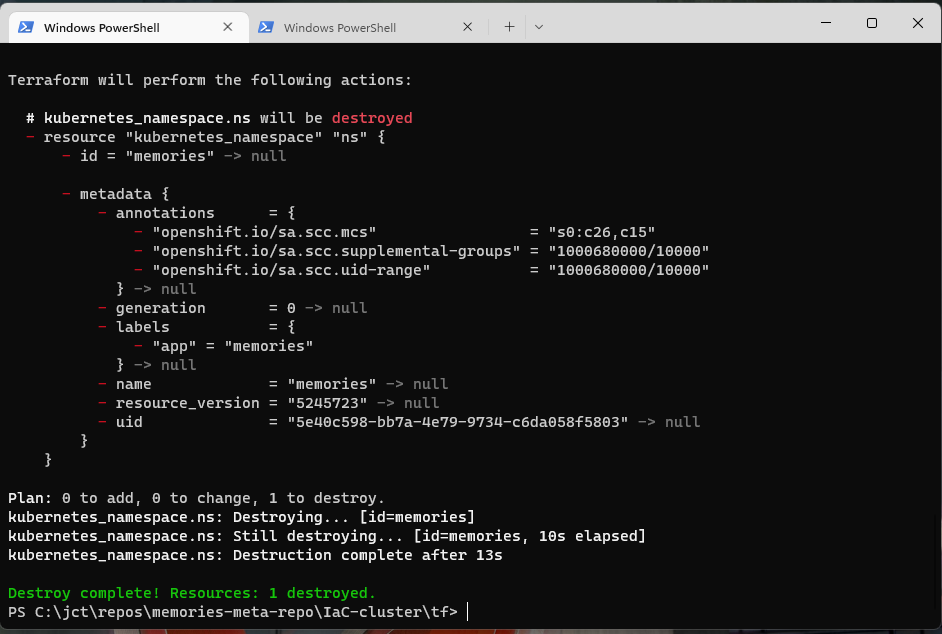
Like the apply command, destroy displays the changes made. After you execute the destroy command, it is easy to rebuild your infrastructure; just invoke the apply command.
Conclusion
In Part 2, you built the OpenShift infrastructure using Terraform as the tool for IaC. But as you may have noticed, the cluster was not provisioned using a Terraform script; this was due to a restriction of the account I used to build this project. However, if the account that you’re using has rights/privileges to create clusters, it will not be difficult for you to add the script to create the cluster. In Part 3, you’ll continue to expand your knowledge of Terraform by installing Traefik 2 as the reverse proxy for the cluster with Basic Authentication.